If you haven’t picked up on it by now, I really love it when activities can span across multiple weeks and have multiple steps and goals that shift and change each week. I feel like it helps kids recall their prior OT sessions as one overarching goal-oriented thing instead of only a handful of little disparate playtimes. I feel like it also gives opportunities for planning into the future. Often kids will tell me an experimental idea they have for where we could take an activity next, and I’ll make that happen by the following week!
So all that to say, one thing we’ve been working on for weeks now is making “potions” and experimenting with mixing various things together. This has taken the form of lots of different little ideas and within that larger theme was this really fun activity.
I’ve been saving markers that have dried out, for a long time. (Don’t ask to see what my shelves look like…I’m the absolute worst about not throwing anything away because we might use it eventually!) We took the markers and either pried them open with tools or broke them open with tools or our hands.
It surprised me how cautious all of my kids were with this part of the activity. Some of them I expected to be cautious, but some of them are the type of kids who typically get labeled “destructive”, “aggressive” etc by schools. I expected those kids to be ready to smash up some markers and rip them apart! Instead, everyone approached this with a great deal of gravitas and caution, and it made my heart so proud of them!
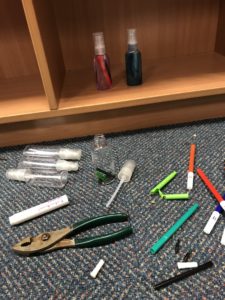
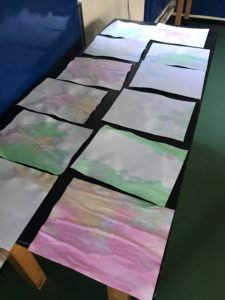
Once we had opened up the marker casings, we got the ink pads out and used scissors to cut them into smaller pieces. Then we put those ink pads into empty clear plastic squirt bottles, and filled it the rest of the way with water. There was some trial-and-error and color experimentation with mixing what colors together to achieve what end result. It was also the case that waiting until the following week — i.e., letting the ink pad sit in the water for a full week — made a much more vibrant watercolor end result than using it right away. That was tough for some children who really wanted to use their color right away. I let them if they wanted to! But it didn’t make as bright of an end result.

We used the squirt bottles to squirt out the watercolor on pieces of blank white paper, which we then set aside to dry. Some kids tried to make a specific picture or design, but it usually didn’t work out too well with the type of squirt bottles that we had. It might work better with a paintbrush or a more specific way to apply the watercolor. Instead, we just sort of made a marbled or tie-dyed looking design on these pieces of paper.
We may continue to grow and expand by using the tie-dyed paper to write or draw on, or cut some shapes out of. Who knows what else we will discover as we keep experimenting!